A solar inverter can be producing power while the battery still refuses to charge. That makes the problem confusing: the panels may look normal, the inverter may be switched on, yet the battery percentage or voltage barely changes.
The good news is that a non-charging battery is often caused by something relatively straightforward, such as insufficient solar voltage, shading, incorrect battery settings, a blown fuse, loose wiring, excessive loads, battery protection, or a battery that has been deeply discharged. Manufacturer troubleshooting guides from Victron and Renogy point to these same areas when diagnosing solar charging problems.
The safest way to troubleshoot the system is to work from the solar panels toward the battery: confirm that the inverter is actually receiving adequate PV power, check whether it recognizes the battery, verify the charging configuration, and then investigate protection or hardware faults.
Why is my solar inverter not charging the battery?
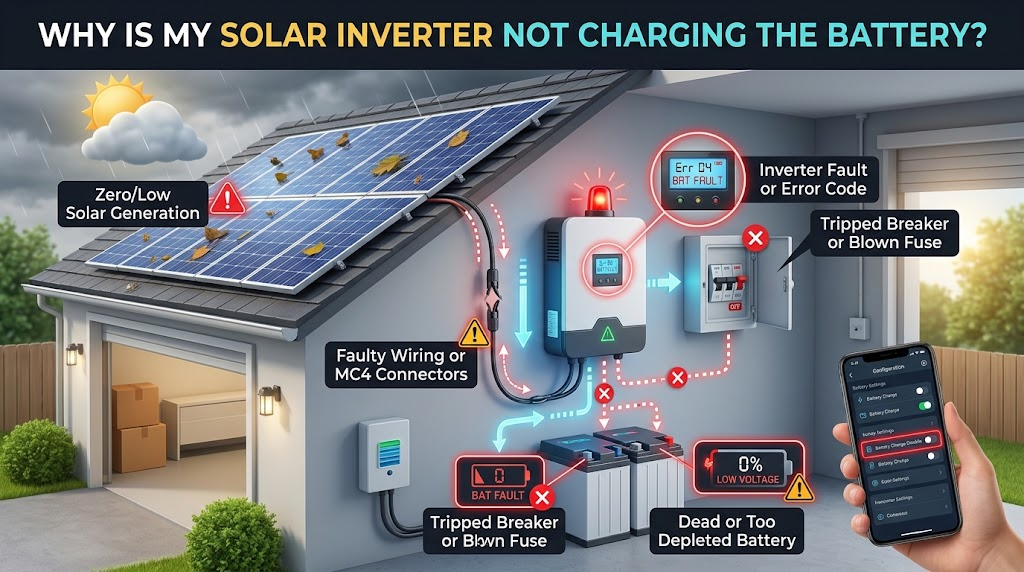
The most common reasons are:
- The solar panels are receiving too little sunlight.
- Panels are shaded, dirty, damaged, or incorrectly wired.
- PV voltage is too low to start the charging process.
- A solar or battery fuse/breaker has opened.
- Battery cables are loose, damaged, or connected with incorrect polarity.
- The inverter has the wrong battery voltage or battery chemistry selected.
- Charging voltage or current limits are configured incorrectly.
- The battery is already near full and the charger has reduced its current.
- A lithium battery's BMS has stopped charging for protection.
- The battery is deeply discharged and is not being detected.
- Heavy loads are consuming most or all of the available solar power.
- The inverter or charge controller has entered a protection state or developed a fault.
For example, Victron's troubleshooting documentation specifically identifies insufficient PV supply, excessive DC loads, voltage drop in battery cables, incorrect charging settings, and battery/temperature-related issues as possible causes of undercharging.
1. Check whether the solar panels are actually producing enough power
Start with the simplest possibility: there may not be enough solar energy available to charge the battery.
Charging can be weak during early morning, late afternoon, heavy cloud cover, or when panels are covered by shade. Trees, buildings, roof structures, dirt, and other obstructions can reduce PV output. Renogy also recommends checking for visible panel damage and shading when solar generation is low.
Look at the inverter's display or monitoring app and check:
- PV voltage
- PV current
- PV power in watts
- Battery voltage
- Battery charging current
- Any warning or fault code
If the inverter shows very little or zero PV power during strong daylight, investigate the solar side before blaming the battery.
Why PV voltage matters
A solar charge controller needs sufficient voltage from the panels before it can transfer energy into the battery. The exact threshold depends on the inverter or MPPT controller.
For example, Victron states that its MPPT chargers need the PV voltage to rise sufficiently above battery voltage before charging starts; its documentation gives a model-specific example where charging starts when PV voltage is 5 V above battery voltage.
That number should not be treated as a universal requirement for every solar inverter. Always use the specifications for your particular model.
2. Look for shade, dirt, or panel problems
A panel does not have to be completely covered to experience reduced output.
Check whether:
- A tree or building is casting a shadow on the panels.
- Dirt or dust is covering the panel surface.
- Bird droppings or other debris are blocking part of a panel.
- A panel has visible cracks or other damage.
- PV connectors appear loose or damaged.
- Wiring has been damaged.
Partial shading can significantly reduce solar generation, depending on the panel arrangement and system design. Renogy's troubleshooting guidance specifically recommends checking shade, visible damage, wiring, and the panel's operating voltage when PV production is low.
If the inverter reports almost no PV voltage during bright sunlight, the issue could be in the panels, connections, fuses, isolators, or PV wiring rather than the battery.
3. Check the battery voltage and battery connection
The inverter needs to recognize the battery correctly before it can charge it.
A useful diagnostic is to compare the battery voltage at the battery terminals with the voltage measured at the inverter or charge-controller battery terminals. A significant difference can indicate a wiring problem, fuse issue, or excessive voltage drop. Renogy recommends this comparison as part of its general charge-controller troubleshooting procedure.
Inspect for:
- Loose battery terminals
- Corroded connections
- Damaged cables
- Blown battery fuses
- Tripped breakers
- Incorrect positive/negative connections
- Undersized or excessively long cables
Do not work on exposed battery or PV wiring unless you understand the electrical hazards involved. Solar arrays and battery banks can produce dangerous voltages and currents even when the inverter appears to be switched off.
4. Check whether a fuse or breaker has disconnected the circuit
A solar system normally has protective devices between components. If one has tripped or a fuse has failed, the inverter may see no usable solar input or battery connection.
Check the manufacturer's wiring diagram and inspect the relevant:
- PV isolator
- PV fuse
- Battery fuse
- DC breaker
- Battery disconnect
- Other system protection devices
Do not replace a fuse with a larger rating simply to make the system operate. The replacement must match the manufacturer's specified protection and the system's wiring.
Victron and Renogy both include fuses, breakers, wiring continuity, and secure connections among their troubleshooting checks for charging problems.
5. Verify the battery type and voltage settings
An inverter needs to know what type of battery it is charging.
Depending on the system, settings may include:
- Battery voltage
- Battery chemistry
- Bulk/absorption charging voltage
- Float voltage
- Charging-current limits
- Temperature compensation
- Lithium-specific charging parameters
If a 12 V, 24 V, or 48 V battery system is configured incorrectly, charging can fail or protection may activate. Renogy's troubleshooting documentation specifically recommends verifying the battery type, battery voltage, and charging parameters.
This is particularly important when replacing an old lead-acid battery with lithium or LiFePO4. Do not copy charging values from another battery. Use the battery manufacturer's specifications and the inverter manufacturer's instructions.
6. The battery may already be full
Sometimes the inverter is charging correctly but appears not to be charging because the battery is close to full.
Solar chargers normally reduce charging current as the battery reaches its charging targets and moves through its charging stages. Renogy notes that charging current can decrease when a battery reaches the float stage, while its troubleshooting checklist explains that reduced current near full charge can be normal.
For example, you might see substantial charging current when the battery is low in the morning and much less current later in the day.
Therefore, low charging current does not automatically mean a faulty inverter.
Check the battery voltage, state of charge, charging stage, and historical solar production rather than judging the system only by the instantaneous charging current.
7. Heavy loads may be consuming the solar power
Your solar system may be generating electricity without putting much of it into the battery.
Imagine the panels are producing 1,000 W while your household loads are using 900 W. Depending on the system architecture and operating conditions, only the remaining available power may be going toward battery charging.
Victron specifically notes that battery charging occurs when PV production exceeds the power consumed by connected DC loads.
If the battery continues falling despite sunlight, temporarily reduce unnecessary loads and observe the system.
Large loads such as:
- Air conditioners
- Water pumps
- Refrigerators
- Electric heaters
- Microwave ovens
- Computers and other equipment
can consume substantial power.
The exact behavior depends on how your inverter is configured and whether it is grid-connected, off-grid, or operating as a hybrid system.
8. A lithium battery's BMS may have stopped charging
Lithium batteries commonly include a Battery Management System (BMS). The BMS monitors conditions such as voltage and temperature and can disconnect charging to protect the battery.
This means the inverter may appear ready to charge while the battery is refusing the charging current.
Low temperature is one example. Victron documents situations in which lithium battery charging is stopped at low temperatures to protect the cells.
A BMS can also react to other battery protection conditions depending on the battery design.
If you have a lithium battery, check its own display, app, indicator lights, and error messages. The battery manufacturer's manual should take priority over generic charging advice.
9. The battery may be deeply discharged
A severely discharged battery can create a different problem: the inverter or charge controller may not recognize it normally.
Some equipment has a minimum battery voltage below which normal charging cannot begin. Renogy documentation, for example, describes cases where an over-discharged battery cannot be detected by a controller and requires appropriate recovery charging.
Do not assume that connecting a random charger or another battery is safe. Deeply discharged lithium batteries, in particular, should be handled according to the battery manufacturer's recovery procedure.
If the battery has reached an unusually low voltage, contact the manufacturer or a qualified installer before attempting recovery.
10. Check for temperature-related charging limits
Temperature can affect charging behavior.
Some lithium batteries restrict or stop charging at low temperatures. Controllers and inverters can also reduce output when their operating temperature becomes excessive.
If your equipment is unusually hot, check:
- Ventilation around the inverter
- Cooling fans
- Ambient temperature
- Battery temperature
- Temperature sensors
- Any temperature-related error messages
Do not cover ventilation openings to protect the equipment from dust. Poor airflow can make thermal problems worse.
11. Check the inverter's error codes
Modern inverters often provide a useful diagnostic clue through an error code, warning message, LED pattern, or mobile app.
Record the exact message rather than searching for a generic description of the problem.
For example, Victron's documented MPPT errors include conditions involving battery overvoltage, low battery temperature, controller overheating, over-current, and PV-input shutdown.
Your inverter may use completely different codes, so the exact model manual is the authoritative source.
Before resetting the system, take a photo or write down the error code. A reset can sometimes remove useful diagnostic information.
A practical troubleshooting sequence
If your solar inverter is not charging the battery, work through the system in this order:
Renogy recommends checking PV and battery recognition, wiring, voltage, battery configuration, and charging parameters when a controller is not charging.
What voltage should a solar panel produce to charge a battery?
There is no single voltage that applies to every solar inverter and battery system.
The required PV voltage depends on the charge controller, battery-bank voltage, panel configuration, and the manufacturer's operating range. An MPPT controller needs sufficient voltage difference between the PV input and battery before it can transfer energy into the battery.
For this reason, avoid assuming that a panel producing a particular voltage is automatically suitable for your battery.
Check the inverter's specifications for:
- Maximum PV voltage
- Minimum/start-up PV voltage
- MPPT operating-voltage range
- Battery voltage range
- Maximum charging current
For example, Victron documents a specific MPPT family where the PV input must be sufficiently above battery voltage to start charging.
What if the inverter shows solar power but the battery is not charging?
This narrows the problem considerably.
If the inverter clearly detects PV power but battery charging remains at zero, investigate the battery side and charging controls first.
Check:
- Is the battery voltage being displayed correctly?
- Is the battery actually connected?
- Is the battery fuse or breaker intact?
- Is the battery type configured correctly?
- Is charging disabled by a BMS?
- Is the battery already at its charging limit?
- Is there a battery overvoltage or temperature warning?
- Are charging-current limits set appropriately?
- Is the inverter configured to prioritize another operating mode?
If PV production is normal but the inverter reports a battery fault, the battery or its protection system becomes a more likely area to investigate.
What if the battery charges very slowly?
Slow charging does not necessarily indicate a fault.
The charging rate depends on available solar power, battery state of charge, battery capacity, charging limits, temperature, system losses, and the power being consumed by other loads.
For example, a large battery connected to a relatively small solar array may naturally take a long time to recharge.
Victron lists insufficient solar supply, high DC load, battery-cable voltage drop, and low charging settings among potential causes of undercharging.
If the charging current is consistently much lower than expected under strong sunlight, compare the inverter's PV readings with the solar array's specifications and investigate shading, wiring, configuration, and temperature.
When should you call a professional?
Stop troubleshooting and seek qualified assistance if you encounter:
- Burn marks or melted connectors
- Swollen or physically damaged batteries
- Strong chemical odors
- Sparks or arcing
- Exposed high-voltage conductors
- Repeated inverter faults
- Abnormally hot cables or terminals
- A damaged lithium battery
- Uncertainty about safely isolating the PV or battery circuits
Solar panels can remain electrically energized in daylight, and battery systems can deliver very high fault currents. A multimeter should only be used if you know how to perform the measurement safely and understand the voltage range of the circuit.
For a persistent fault, the inverter manufacturer, battery manufacturer, or a qualified solar technician can determine whether the problem is a configuration issue, battery protection event, wiring fault, or failed hardware.
Common mistakes to avoid
One of the easiest ways to make a charging problem worse is to start changing settings before identifying the cause.
Avoid these mistakes:
- Increasing charging voltage randomly. The correct values depend on the battery.
- Replacing a fuse with a higher-rated fuse. This can compromise system protection.
- Assuming zero charging current means failure. A nearly full battery may naturally receive little current.
- Ignoring household loads. Solar power may be consumed immediately rather than stored.
- Judging panel performance from sunlight alone. Bright conditions do not guarantee correct PV voltage or wiring.
- Resetting the inverter repeatedly without recording error codes.
- Using generic lithium charging settings. Battery manufacturers can specify different requirements.
- Working on energized PV or battery wiring without the proper knowledge and equipment.
A systematic diagnosis is safer and usually faster than changing multiple variables at once.
Frequently asked questions
Why is my solar inverter showing solar power but not charging the battery?
The inverter may be receiving PV power while charging is disabled or restricted by the battery, BMS, charging settings, temperature limits, battery voltage, or system configuration. Check the battery voltage, charging status, error messages, and battery settings first.
Can a shaded solar panel stop the battery from charging?
Yes. Shading can substantially reduce available PV power. If the remaining solar production is insufficient for the system's charging requirements and loads, the battery may receive little or no charging current.
Why does my solar battery charge during the day but lose charge at night?
Solar panels normally stop producing power at night, so the battery supplies the loads unless another source, such as the electrical grid or generator, is configured to take over. If the battery loses charge unusually quickly, check overnight loads, battery condition, and the inverter's operating mode.
Can a bad battery stop a solar inverter from charging?
Yes. A battery can be too deeply discharged, outside an acceptable voltage range, protected by its BMS, damaged, or otherwise unable to accept charging. The inverter may also stop charging when it detects a battery-related fault.
Should I reset my solar inverter if it is not charging?
A restart may clear some temporary faults, but it should not be the first response to an unexplained charging problem. Record any error code first and consult the inverter's manual for the correct restart procedure.
Conclusion
When a solar inverter is not charging the battery, the problem is usually easier to isolate when you treat the system as a chain: solar panels → PV wiring/protection → inverter or MPPT charger → battery wiring/protection → battery/BMS.
Start by checking whether the inverter is receiving adequate PV voltage and power. Then confirm that it recognizes the battery, inspect wiring and protection devices, verify battery and charging settings, and look for BMS or temperature-related restrictions. Manufacturer troubleshooting guides consistently recommend this kind of step-by-step approach rather than immediately assuming the inverter itself has failed.
If the system still will not charge after these checks, the exact inverter and battery models matter. Their manuals can reveal model-specific voltage limits, charging stages, error codes, and recovery procedures that generic troubleshooting cannot safely replace.